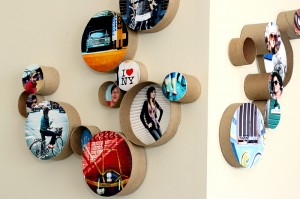
DIY Cardboard Ring Frames
This is a great project for those DIY'ers who love to be "earth friendly"! Shared by our friends over at Photojojo, this project is fairly simple and creates quite a dramatic will display. Take it a step further by painting the edges of the circles to really get some impact!

What You'll Need

- An assortment of cardboard tubes: toilet paper rolls, paper towel rolls, shipping tubes, even oatmeal boxes!
- Sandpaper (optional)
- Ruler
- Pencil
- X-acto knife
- A whole bunch o’ photos
- Scissors or circle cutter
- White glue
-------------------------------------------------------------------------------------------------------------------------------
Step 1: Clean Up the Rolls
Remove any labels or leftover paper from each of the cardboard rolls.
If the paper doesn’t peel off readily, you can scrub it away with a small piece of sandpaper.
Step 2: Mark Rolls
Now to divide those rolls into rings of varying widths. Make many different sizes so you have a good mix when you put them on the wall.
Using a ruler and pencil to mark the width of each ring will help you keep the cuts straight and level.
Step 3: Cut Tubes Into Rings
Use the X-acto knife and/or scissors to cut the tubes into many different-sized rings.
Step 4: Trace Circles
Trace around the ring to mark a circle on the photo you want to frame.
Cut out the circle using scissors (or a circle cutter). The circle should be just a bit wider than the outside of the ring.
Step 5: Glue Photos to Rings
Draw a thin bead of glue on the rim of the cardboard ring and glue the photo circle in place.
You can glue the photo to the front of the ring so it stands out from the wall, or to the back of the ring so you can peer in at it.
Step 6: Repeat
While the glue dries on the first ring, repeat Steps 4 and 5 with the remaining cardboard rings and photos.
Step 7: Glue Rings Together
When all the rings are done and dry, use a little white glue on the side of the rings to glue them together.
Arrange them in a circle, a random pattern, or any dang ol’ way you like!
Step 8: Put them Up
Hang the rings on the wall by putting up a few pushpins or small nails and slipping the rings over them.

Photo credits: Fabulous Muscles, Digital Sophia, ’stpiduko’, and moriza. Project originally posted at Photojojo.com